TechGEEK
Welcome Visitors .. Dont Forget to Leave a comment :)
Wednesday, July 27, 2016
How to Repair a Computer
Any abnormality in the integrated components of a computer can prove harmful to its performance, but some general computer issues can be addressed at personal level. There are effective computer repair tips and tricks which can be implemented to resolve these problems. Computer repair is important because we are becoming dependent on it for every personal and professional task. There is a variety of problems; some are simple while others are complicated. However, you can repair your system on your own by following some tips and tricks.
Computer freezing
Computers may freeze on account of any hardware or software issue, so here you need to understand the exact reason behind it. Notice if the issue started when you connected any hardware peripherals like a printer or scanner; then it might be due to a driver conflict. If the issue occurred after installing a new hard drive, then it might be due to insufficient power or too much heat. Follow the troubleshooting pattern below to repair your computer, if such problems occur.
1
Give your computer a bit of rest. If you leave your computer on all the time, you can often fix a problem by turning off the computer, then unplugging it (or remove the battery, if it is a laptop), then holding down the power button for 30 seconds while computer remains unplugged (this will often cause a light, or lights, to flash), then reinserting the battery, plugging the computer back in and powering it on. By cutting off the power to the motherboard, it allows the hardware to reset and the memory to clear.
- 2Determine if your computer becomes too hot. You will need to take a look inside for this. Remember that any time you need to open up your computer cabinet, shut down your computer and unplug it. If you have long hair, tie it back. Take off any jewelry that might get in the way. Also avoid wearing any clothing that produces a lot of static, as a spark can damage hardware and cause intermittent, hard-to-troubleshoot problems.
- 3Diagnostics. Many computers now come with built-in diagnostics which can tell you if you have certain issues. Two brands of computer that normally have diagnostic options are HP/Compaq and Dell. To access these diagnostic options:
- Power down the computer, wait a few seconds then turn it back on.
- HP - Immediately start pressing F2 on startup to access the diagnostic menu. Select Start Up Test, Quick, One Pass (if option is present) to begin the testing process.
- Dell - Immediately start pressing F12 on startup to access the diagnostic menu. Use the arrow keys to select Diagnostics from the menu.
- Write down any error codes and consult the internet, the computer manufacturer or a local technician for assistance.
4
Open the cabinet of your computer and check the temperature of the metal chassis. If it’s hot, then there may be a heat related issue. For laptops, you generally do not want to try to open the case, but you can still vacuum the fan ports. Some computers just run hot, particularly laptops, but heat is never good for electronics. Gently examine the front and rear fans and blow out any dust. You can apply a clean cloth to dust out hidden particles. Remember: Your computer must be shut down while you're cleaning inside it.
- If you have more than one hard drive in your computer, avoid installing them right next to each other in the chassis; this makes them more prone to heat failure. To install an extra hard drive in a wide slot, such as the slot that holds your CD-ROM or DVD-ROM drive, you can buy mounting brackets at a store that sells computer parts.
- Even if your computer isn't having problems, it's a good idea to clean the fans regularly.
- Before you close up the case, check all the cables and make sure everything is still plugged in. If you have to reset a video card or a stick of memory, avoid applying heavy pressure to the motherboard as this can damage it.
5
Inspect your Device Drivers. Many times when doing a Windows Update, your system may download and install an incorrect driver, which may result in the computer freezing. You can check the status of drivers from Device Manager. Any devices with a yellow exclamation next to them are in an error state. Unplug any USB devices, if connected, and see if the error goes away. If so, that device is a problem. Power-on your computer and see if it works. If it does, good; otherwise you can restore your computer to an earlier configuration. System Restore will roll your system back to an earlier set of drivers.
- 7Inspect your Hard Disk.Your hard disk is a storehouse of information, so when it gets used for a long duration it might get cluttered and patchy; this slows down the performance of your computer. Hence, use your Windows utility CHKDSK to scan and remove bad sectors on regular basis. It is the best preventive way of maintaining computer health.
- 8Install and run a good antivirus and anti-malware program.
Blue Screen of Death and No Boot
- 1No Power. If your computer does not power on at all, the most likely culprits are either Power Supply (desktop only) or motherboard.
- 2No Boot or Blue Screen. If your computer has power (you see lights, hear fans spinning), but nothing on the screen, or if the computer starts to boot up and then crashes with a 'blue screen', there are several possible issues. NOTE: Any hardware changes must be done while computer is completely powered down and unplugged / battery removed!!
- Try Safe Mode - if your computer will boot into Safe Mode, it is a software related issue.
- Test Screen - If you hear the computer running, but see nothing on the screen, try swapping monitors or plugging in an external monitor for laptops.
- Test RAM - try carefully removing the ram and powering on. Most computers, when functioning properly, will give a long, repeating 'memory error' beep. Power off and replace the ram, one stick at a time, powering on when ram is properly seated.
- Test Video Card - if your computer has a removable video card, try removing it and either replacing it or plugging your monitor into the built-in video port if available.
- If none of these things work, you are likely looking at a failed hard drive, corrupted operating system or failed motherboard. It is best to seek professional services at this time.
- if you have questions about repairing your computer/s just leave a comment :D
- Reference:
- http://www.wikihow.com/Repair-a-Computer
Tuesday, July 26, 2016
THE IMPERIAL MARCH
USING ARDUINO AND BUZZER by eserra
This tutorial teaches you on how to play the The Imperial March by the use of Arduino and buzzer.
Hardware requirements:
- An Arduino
- Piezo buzzer
Circuit:
Code:
// NB: ALL NOTES DEFINED WITH STANDARD ENGLISH NAMES, EXCEPT FROM "A"
//THAT IS CALLED WITH THE ITALIAN NAME "LA" BECAUSE A0,A1...ARE THE ANALOG PINS ON ARDUINO.
// (Ab IS CALLED Ab AND NOT LAb)
#define C0 16.35
#define Db0 17.32
#define D0 18.35
#define Eb0 19.45
#define E0 20.60
#define F0 21.83
#define Gb0 23.12
#define G0 24.50
#define Ab0 25.96
#define LA0 27.50
#define Bb0 29.14
#define B0 30.87
#define C1 32.70
#define Db1 34.65
#define D1 36.71
#define Eb1 38.89
#define E1 41.20
#define F1 43.65
#define Gb1 46.25
#define G1 49.00
#define Ab1 51.91
#define LA1 55.00
#define Bb1 58.27
#define B1 61.74
#define C2 65.41
#define Db2 69.30
#define D2 73.42
#define Eb2 77.78
#define E2 82.41
#define F2 87.31
#define Gb2 92.50
#define G2 98.00
#define Ab2 103.83
#define LA2 110.00
#define Bb2 116.54
#define B2 123.47
#define C3 130.81
#define Db3 138.59
#define D3 146.83
#define Eb3 155.56
#define E3 164.81
#define F3 174.61
#define Gb3 185.00
#define G3 196.00
#define Ab3 207.65
#define LA3 220.00
#define Bb3 233.08
#define B3 246.94
#define C4 261.63
#define Db4 277.18
#define D4 293.66
#define Eb4 311.13
#define E4 329.63
#define F4 349.23
#define Gb4 369.99
#define G4 392.00
#define Ab4 415.30
#define LA4 440.00
#define Bb4 466.16
#define B4 493.88
#define C5 523.25
#define Db5 554.37
#define D5 587.33
#define Eb5 622.25
#define E5 659.26
#define F5 698.46
#define Gb5 739.99
#define G5 783.99
#define Ab5 830.61
#define LA5 880.00
#define Bb5 932.33
#define B5 987.77
#define C6 1046.50
#define Db6 1108.73
#define D6 1174.66
#define Eb6 1244.51
#define E6 1318.51
#define F6 1396.91
#define Gb6 1479.98
#define G6 1567.98
#define Ab6 1661.22
#define LA6 1760.00
#define Bb6 1864.66
#define B6 1975.53
#define C7 2093.00
#define Db7 2217.46
#define D7 2349.32
#define Eb7 2489.02
#define E7 2637.02
#define F7 2793.83
#define Gb7 2959.96
#define G7 3135.96
#define Ab7 3322.44
#define LA7 3520.01
#define Bb7 3729.31
#define B7 3951.07
#define C8 4186.01
#define Db8 4434.92
#define D8 4698.64
#define Eb8 4978.03
// DURATION OF THE NOTES
#define BPM 120 // you can change this value changing all the others
#define H 2*Q //half 2/4
#define Q 60000/BPM //quarter 1/4
#define E Q/2 //eighth 1/8
#define S Q/4 // sixteenth 1/16
#define W 4*Q // whole 4/4
void setup() {
pinMode(8, OUTPUT);
pinMode(9, OUTPUT);
digitalWrite(9,LOW);
}
// the loop routine runs over and over again forever:
void loop() {
//tone(pin, note, duration)
tone(8,LA3,Q);
delay(1+Q); //delay duration should always be 1 ms more than the note in order to separate them.
tone(8,LA3,Q);
delay(1+Q);
tone(8,LA3,Q);
delay(1+Q);
tone(8,F3,E+S);
delay(1+E+S);
tone(8,C4,S);
delay(1+S);
tone(8,LA3,Q);
delay(1+Q);
tone(8,F3,E+S);
delay(1+E+S);
tone(8,C4,S);
delay(1+S);
tone(8,LA3,H);
delay(1+H);
tone(8,E4,Q);
delay(1+Q);
tone(8,E4,Q);
delay(1+Q);
tone(8,E4,Q);
delay(1+Q);
tone(8,F4,E+S);
delay(1+E+S);
tone(8,C4,S);
delay(1+S);
tone(8,Ab3,Q);
delay(1+Q);
tone(8,F3,E+S);
delay(1+E+S);
tone(8,C4,S);
delay(1+S);
tone(8,LA3,H);
delay(1+H);
tone(8,LA4,Q);
delay(1+Q);
tone(8,LA3,E+S);
delay(1+E+S);
tone(8,LA3,S);
delay(1+S);
tone(8,LA4,Q);
delay(1+Q);
tone(8,Ab4,E+S);
delay(1+E+S);
tone(8,G4,S);
delay(1+S);
tone(8,Gb4,S);
delay(1+S);
tone(8,E4,S);
delay(1+S);
tone(8,F4,E);
delay(1+E);
delay(1+E);//PAUSE
tone(8,Bb3,E);
delay(1+E);
tone(8,Eb4,Q);
delay(1+Q);
tone(8,D4,E+S);
delay(1+E+S);
tone(8,Db4,S);
delay(1+S);
tone(8,C4,S);
delay(1+S);
tone(8,B3,S);
delay(1+S);
tone(8,C4,E);
delay(1+E);
delay(1+E);//PAUSE QUASI FINE RIGA
tone(8,F3,E);
delay(1+E);
tone(8,Ab3,Q);
delay(1+Q);
tone(8,F3,E+S);
delay(1+E+S);
tone(8,LA3,S);
delay(1+S);
tone(8,C4,Q);
delay(1+Q);
tone(8,LA3,E+S);
delay(1+E+S);
tone(8,C4,S);
delay(1+S);
tone(8,E4,H);
delay(1+H);
tone(8,LA4,Q);
delay(1+Q);
tone(8,LA3,E+S);
delay(1+E+S);
tone(8,LA3,S);
delay(1+S);
tone(8,LA4,Q);
delay(1+Q);
tone(8,Ab4,E+S);
delay(1+E+S);
tone(8,G4,S);
delay(1+S);
tone(8,Gb4,S);
delay(1+S);
tone(8,E4,S);
delay(1+S);
tone(8,F4,E);
delay(1+E);
delay(1+E);//PAUSE
tone(8,Bb3,E);
delay(1+E);
tone(8,Eb4,Q);
delay(1+Q);
tone(8,D4,E+S);
delay(1+E+S);
tone(8,Db4,S);
delay(1+S);
tone(8,C4,S);
delay(1+S);
tone(8,B3,S);
delay(1+S);
tone(8,C4,E);
delay(1+E);
delay(1+E);//PAUSE QUASI FINE RIGA
tone(8,F3,E);
delay(1+E);
tone(8,Ab3,Q);
delay(1+Q);
tone(8,F3,E+S);
delay(1+E+S);
tone(8,C4,S);
delay(1+S);
tone(8,LA3,Q);
delay(1+Q);
tone(8,F3,E+S);
delay(1+E+S);
tone(8,C4,S);
delay(1+S);
tone(8,LA3,H);
delay(1+H);
delay(2*H);
}
Reference:
http://www.instructables.com/id/How-to-easily-play-music-with-buzzer-on-arduino-Th/?ALLSTEPS
Done!
Enjoy
Dont forget to leave a comment :D
Super Mario theme song w/ piezo buzzer and Arduino!
BY PRINCE · 06/07/2014
This tutorial teaches you on how to play the Super Mario theme song by the use of Arduino and Piezo buzzer.
Hardware requirements:
- An Arduino
- Piezo buzzer
- 1 k ohm resistor(any resistor between 333 ohm to 1 k should be fine in this project)
- A breadboard
- Some breadboard cable(s)
Circuit:
Code:
/*
Arduino Mario Bros Tunes
With Piezo Buzzer and PWM
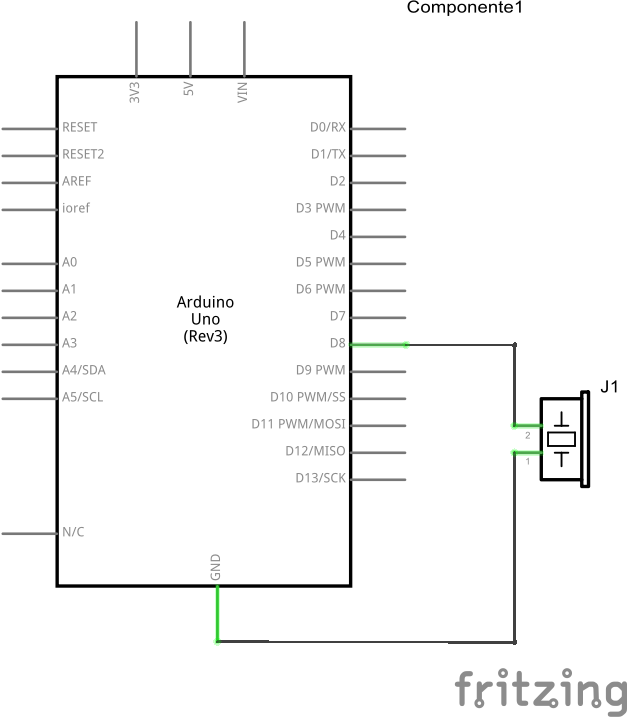
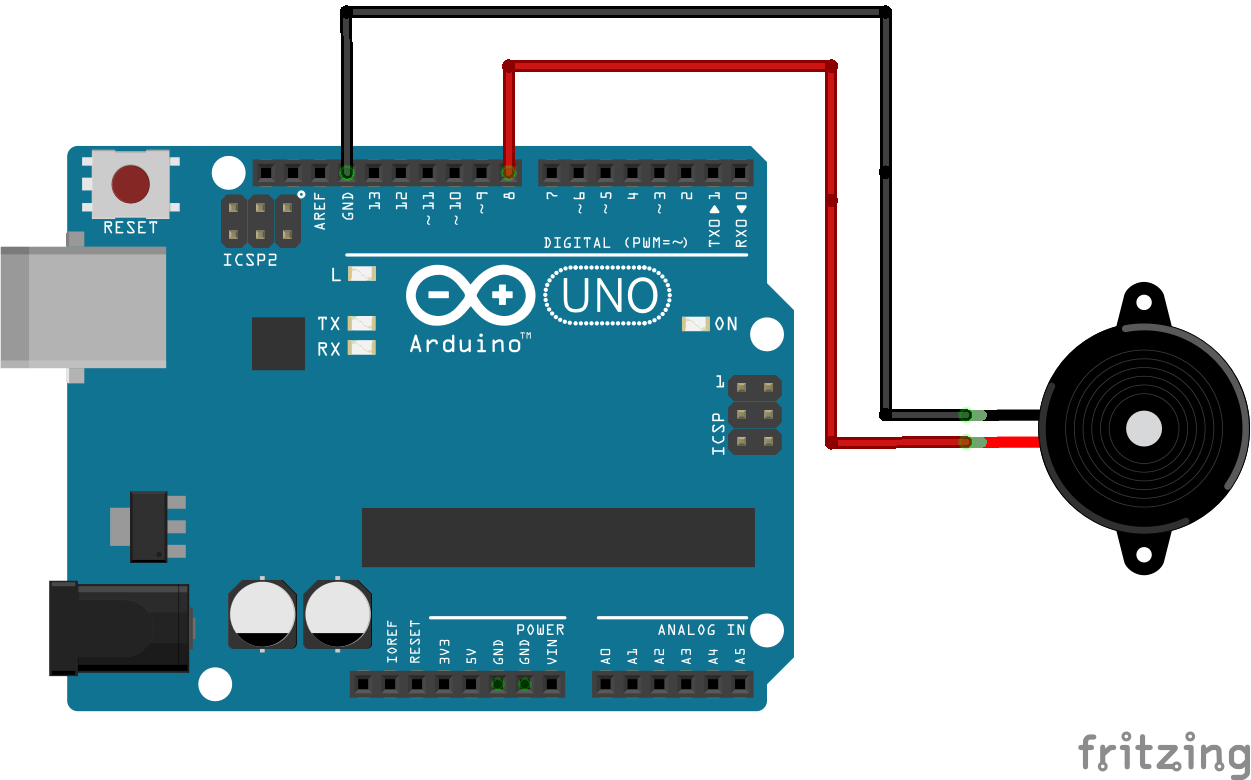
Connect the positive side of the Buzzer to pin 3,
then the negative side to a 1k ohm resistor. Connect
the other side of the 1 k ohm resistor to
ground(GND) pin on the Arduino.
by: Dipto Pratyaksa
last updated: 31/3/13
*/
/*************************************************
* Public Constants
*************************************************/
#define NOTE_B0 31
#define NOTE_C1 33
#define NOTE_CS1 35
#define NOTE_D1 37
#define NOTE_DS1 39
#define NOTE_E1 41
#define NOTE_F1 44
#define NOTE_FS1 46
#define NOTE_G1 49
#define NOTE_GS1 52
#define NOTE_A1 55
#define NOTE_AS1 58
#define NOTE_B1 62
#define NOTE_C2 65
#define NOTE_CS2 69
#define NOTE_D2 73
#define NOTE_DS2 78
#define NOTE_E2 82
#define NOTE_F2 87
#define NOTE_FS2 93
#define NOTE_G2 98
#define NOTE_GS2 104
#define NOTE_A2 110
#define NOTE_AS2 117
#define NOTE_B2 123
#define NOTE_C3 131
#define NOTE_CS3 139
#define NOTE_D3 147
#define NOTE_DS3 156
#define NOTE_E3 165
#define NOTE_F3 175
#define NOTE_FS3 185
#define NOTE_G3 196
#define NOTE_GS3 208
#define NOTE_A3 220
#define NOTE_AS3 233
#define NOTE_B3 247
#define NOTE_C4 262
#define NOTE_CS4 277
#define NOTE_D4 294
#define NOTE_DS4 311
#define NOTE_E4 330
#define NOTE_F4 349
#define NOTE_FS4 370
#define NOTE_G4 392
#define NOTE_GS4 415
#define NOTE_A4 440
#define NOTE_AS4 466
#define NOTE_B4 494
#define NOTE_C5 523
#define NOTE_CS5 554
#define NOTE_D5 587
#define NOTE_DS5 622
#define NOTE_E5 659
#define NOTE_F5 698
#define NOTE_FS5 740
#define NOTE_G5 784
#define NOTE_GS5 831
#define NOTE_A5 880
#define NOTE_AS5 932
#define NOTE_B5 988
#define NOTE_C6 1047
#define NOTE_CS6 1109
#define NOTE_D6 1175
#define NOTE_DS6 1245
#define NOTE_E6 1319
#define NOTE_F6 1397
#define NOTE_FS6 1480
#define NOTE_G6 1568
#define NOTE_GS6 1661
#define NOTE_A6 1760
#define NOTE_AS6 1865
#define NOTE_B6 1976
#define NOTE_C7 2093
#define NOTE_CS7 2217
#define NOTE_D7 2349
#define NOTE_DS7 2489
#define NOTE_E7 2637
#define NOTE_F7 2794
#define NOTE_FS7 2960
#define NOTE_G7 3136
#define NOTE_GS7 3322
#define NOTE_A7 3520
#define NOTE_AS7 3729
#define NOTE_B7 3951
#define NOTE_C8 4186
#define NOTE_CS8 4435
#define NOTE_D8 4699
#define NOTE_DS8 4978
#define melodyPin 3
//Mario main theme melody
int melody[] = {
NOTE_E7, NOTE_E7, 0, NOTE_E7,
0, NOTE_C7, NOTE_E7, 0,
NOTE_G7, 0, 0, 0,
NOTE_G6, 0, 0, 0,
NOTE_C7, 0, 0, NOTE_G6,
0, 0, NOTE_E6, 0,
0, NOTE_A6, 0, NOTE_B6,
0, NOTE_AS6, NOTE_A6, 0,
NOTE_G6, NOTE_E7, NOTE_G7,
NOTE_A7, 0, NOTE_F7, NOTE_G7,
0, NOTE_E7, 0, NOTE_C7,
NOTE_D7, NOTE_B6, 0, 0,
NOTE_C7, 0, 0, NOTE_G6,
0, 0, NOTE_E6, 0,
0, NOTE_A6, 0, NOTE_B6,
0, NOTE_AS6, NOTE_A6, 0,
NOTE_G6, NOTE_E7, NOTE_G7,
NOTE_A7, 0, NOTE_F7, NOTE_G7,
0, NOTE_E7, 0, NOTE_C7,
NOTE_D7, NOTE_B6, 0, 0
};
//Mario main them tempo
int tempo[] = {
12, 12, 12, 12,
12, 12, 12, 12,
12, 12, 12, 12,
12, 12, 12, 12,
12, 12, 12, 12,
12, 12, 12, 12,
12, 12, 12, 12,
12, 12, 12, 12,
9, 9, 9,
12, 12, 12, 12,
12, 12, 12, 12,
12, 12, 12, 12,
12, 12, 12, 12,
12, 12, 12, 12,
12, 12, 12, 12,
12, 12, 12, 12,
9, 9, 9,
12, 12, 12, 12,
12, 12, 12, 12,
12, 12, 12, 12,
};
//Underworld melody
int underworld_melody[] = {
NOTE_C4, NOTE_C5, NOTE_A3, NOTE_A4,
NOTE_AS3, NOTE_AS4, 0,
0,
NOTE_C4, NOTE_C5, NOTE_A3, NOTE_A4,
NOTE_AS3, NOTE_AS4, 0,
0,
NOTE_F3, NOTE_F4, NOTE_D3, NOTE_D4,
NOTE_DS3, NOTE_DS4, 0,
0,
NOTE_F3, NOTE_F4, NOTE_D3, NOTE_D4,
NOTE_DS3, NOTE_DS4, 0,
0, NOTE_DS4, NOTE_CS4, NOTE_D4,
NOTE_CS4, NOTE_DS4,
NOTE_DS4, NOTE_GS3,
NOTE_G3, NOTE_CS4,
NOTE_C4, NOTE_FS4, NOTE_F4, NOTE_E3, NOTE_AS4, NOTE_A4,
NOTE_GS4, NOTE_DS4, NOTE_B3,
NOTE_AS3, NOTE_A3, NOTE_GS3,
0, 0, 0
};
//Underwolrd tempo
int underworld_tempo[] = {
12, 12, 12, 12,
12, 12, 6,
3,
12, 12, 12, 12,
12, 12, 6,
3,
12, 12, 12, 12,
12, 12, 6,
3,
12, 12, 12, 12,
12, 12, 6,
6, 18, 18, 18,
6, 6,
6, 6,
6, 6,
18, 18, 18, 18, 18, 18,
10, 10, 10,
10, 10, 10,
3, 3, 3
};
void setup(void)
{
pinMode(3, OUTPUT);//buzzer
pinMode(13, OUTPUT);//led indicator when singing a note
}
void loop()
{
//sing the tunes
sing(1);
sing(1);
sing(2);
}
int song = 0;
void sing(int s) {
// iterate over the notes of the melody:
song = s;
if (song == 2) {
Serial.println(" 'Underworld Theme'");
int size = sizeof(underworld_melody) / sizeof(int);
for (int thisNote = 0; thisNote < size; thisNote++) {
// to calculate the note duration, take one second
// divided by the note type.
//e.g. quarter note = 1000 / 4, eighth note = 1000/8, etc.
int noteDuration = 1000 / underworld_tempo[thisNote];
buzz(melodyPin, underworld_melody[thisNote], noteDuration);
// to distinguish the notes, set a minimum time between them.
// the note's duration + 30% seems to work well:
int pauseBetweenNotes = noteDuration * 1.30;
delay(pauseBetweenNotes);
// stop the tone playing:
buzz(melodyPin, 0, noteDuration);
}
} else {
Serial.println(" 'Mario Theme'");
int size = sizeof(melody) / sizeof(int);
for (int thisNote = 0; thisNote < size; thisNote++) {
// to calculate the note duration, take one second
// divided by the note type.
//e.g. quarter note = 1000 / 4, eighth note = 1000/8, etc.
int noteDuration = 1000 / tempo[thisNote];
buzz(melodyPin, melody[thisNote], noteDuration);
// to distinguish the notes, set a minimum time between them.
// the note's duration + 30% seems to work well:
int pauseBetweenNotes = noteDuration * 1.30;
delay(pauseBetweenNotes);
// stop the tone playing:
buzz(melodyPin, 0, noteDuration);
}
}
}
void buzz(int targetPin, long frequency, long length) {
digitalWrite(13, HIGH);
long delayValue = 1000000 / frequency / 2; // calculate the delay value between transitions
//// 1 second's worth of microseconds, divided by the frequency, then split in half since
//// there are two phases to each cycle
long numCycles = frequency * length / 1000; // calculate the number of cycles for proper timing
//// multiply frequency, which is really cycles per second, by the number of seconds to
//// get the total number of cycles to produce
for (long i = 0; i < numCycles; i++) { // for the calculated length of time...
digitalWrite(targetPin, HIGH); // write the buzzer pin high to push out the diaphram
delayMicroseconds(delayValue); // wait for the calculated delay value
digitalWrite(targetPin, LOW); // write the buzzer pin low to pull back the diaphram
delayMicroseconds(delayValue); // wait again or the calculated delay value
}
digitalWrite(13, LOW);
}
Done!
Enjoy the Super Mario theme song :D
Original post:
http://www.linuxcircle.com/2013/03/31/playing-mario-bros-tune-with-arduino-and-piezo-buzzer/
Sunday, July 24, 2016
Arduino library supports
========================================================================
tone()
Description
Generates a square wave of the specified frequency (and 50% duty cycle) on a pin. A duration can be specified, otherwise the wave continues until a call to noTone(). The pin can be connected to a piezo buzzer or other speaker to play tones.
Only one tone can be generated at a time. If a tone is already playing on a different pin, the call to tone() will have no effect. If the tone is playing on the same pin, the call will set its frequency.
Use of the tone() function will interfere with PWM output on pins 3 and 11 (on boards other than the Mega).
| Board | Min frequency (Hz) | Max frequency (Hz) |
| Uno, Mega, Leonardo and other AVR boards | 31 | 65535 |
| Gemma | Not implemented | Not implemented |
| Zero | 41 | 275000 |
| Due | Not implemented | Not implemented |
For technical details, see Brett Hagman's notes.
NOTE: if you want to play different pitches on multiple pins, you need to call noTone() on one pin before calling tone() on the next pin.
Syntax
tone(pin, frequency)
tone(pin, frequency, duration)
Parameters
pin: the pin on which to generate the tone
frequency: the frequency of the tone in hertz - unsigned int
duration: the duration of the tone in milliseconds (optional) - unsigned long
Returns
nothing
noTone()
========================================================================
noTone()
Description
Stops the generation of a square wave triggered by tone(). Has no effect if no tone is being generated.
NOTE: if you want to play different pitches on multiple pins, you need to call noTone() on one pin before calling tone() on the next pin.
Syntax
noTone(pin)
Parameters
pin: the pin on which to stop generating the tone
Returns
nothing
========================================================================
Play a Melody using the tone() function
This example shows how to use the
Hardware Required
tone() command to generate notes. It plays a little melody you may have heard before.Hardware Required
- Arduino or Genuino board
- piezo buzzer or a speaker
- hook-up wires
Example 1:
code:
void setup()
{
tone(11, 4000, 1000); // 4000hz for 1sec.
}
void loop()
{
}
Note: The output for this code is located at the pin 11.
Circuit
After you do this circuit, upload the code to your arduino uno then listen to the buzzer.
Example 2:
code:
void setup()
{
for (int i =31; i<10000; i++)
{
tone(11, i, 1000);
delay(10);
}
}
void loop()
{
}
Note: this code will start from the lowest tone to the highest tone limit.
Example 3:
Circuit
Code
The code below uses an extra file, pitches.h. This file contains all the pitch values for typical notes. For example, NOTE_C4 is middle C. NOTE_FS4 is F sharp, and so forth. This note table was originally written by Brett Hagman, on whose work the tone() command was based. You may find it useful for whenever you want to make musical notes.
The main sketch is as follows:
/*
Melody
Plays a melody
circuit:
* 8-ohm speaker on digital pin 8
created 21 Jan 2010
modified 30 Aug 2011
by Tom Igoe
This example code is in the public domain.
http://www.arduino.cc/en/Tutorial/Tone
*/
#include "pitches.h"
// notes in the melody:
int melody[] = {
NOTE_C4, NOTE_G3, NOTE_G3, NOTE_A3, NOTE_G3, 0, NOTE_B3, NOTE_C4
};
// note durations: 4 = quarter note, 8 = eighth note, etc.:
int noteDurations[] = {
4, 8, 8, 4, 4, 4, 4, 4
};
void setup() {
// iterate over the notes of the melody:
for (int thisNote = 0; thisNote < 8; thisNote++) {
// to calculate the note duration, take one second
// divided by the note type.
//e.g. quarter note = 1000 / 4, eighth note = 1000/8, etc.
int noteDuration = 1000 / noteDurations[thisNote];
tone(8, melody[thisNote], noteDuration);
// to distinguish the notes, set a minimum time between them.
// the note's duration + 30% seems to work well:
int pauseBetweenNotes = noteDuration * 1.30;
delay(pauseBetweenNotes);
// stop the tone playing:
noTone(8);
}
}
void loop() {
// no need to repeat the melody.
}
To make the pitches.h file, either click on the button just below the serial monitor icon and choose "New Tab", or use Ctrl+Shift+N.Then paste in the following code:/************************************************* * Public Constants *************************************************/ #define NOTE_B0 31 #define NOTE_C1 33 #define NOTE_CS1 35 #define NOTE_D1 37 #define NOTE_DS1 39 #define NOTE_E1 41 #define NOTE_F1 44 #define NOTE_FS1 46 #define NOTE_G1 49 #define NOTE_GS1 52 #define NOTE_A1 55 #define NOTE_AS1 58 #define NOTE_B1 62 #define NOTE_C2 65 #define NOTE_CS2 69 #define NOTE_D2 73 #define NOTE_DS2 78 #define NOTE_E2 82 #define NOTE_F2 87 #define NOTE_FS2 93 #define NOTE_G2 98 #define NOTE_GS2 104 #define NOTE_A2 110 #define NOTE_AS2 117 #define NOTE_B2 123 #define NOTE_C3 131 #define NOTE_CS3 139 #define NOTE_D3 147 #define NOTE_DS3 156 #define NOTE_E3 165 #define NOTE_F3 175 #define NOTE_FS3 185 #define NOTE_G3 196 #define NOTE_GS3 208 #define NOTE_A3 220 #define NOTE_AS3 233 #define NOTE_B3 247 #define NOTE_C4 262 #define NOTE_CS4 277 #define NOTE_D4 294 #define NOTE_DS4 311 #define NOTE_E4 330 #define NOTE_F4 349 #define NOTE_FS4 370 #define NOTE_G4 392 #define NOTE_GS4 415 #define NOTE_A4 440 #define NOTE_AS4 466 #define NOTE_B4 494 #define NOTE_C5 523 #define NOTE_CS5 554 #define NOTE_D5 587 #define NOTE_DS5 622 #define NOTE_E5 659 #define NOTE_F5 698 #define NOTE_FS5 740 #define NOTE_G5 784 #define NOTE_GS5 831 #define NOTE_A5 880 #define NOTE_AS5 932 #define NOTE_B5 988 #define NOTE_C6 1047 #define NOTE_CS6 1109 #define NOTE_D6 1175 #define NOTE_DS6 1245 #define NOTE_E6 1319 #define NOTE_F6 1397 #define NOTE_FS6 1480 #define NOTE_G6 1568 #define NOTE_GS6 1661 #define NOTE_A6 1760 #define NOTE_AS6 1865 #define NOTE_B6 1976 #define NOTE_C7 2093 #define NOTE_CS7 2217 #define NOTE_D7 2349 #define NOTE_DS7 2489 #define NOTE_E7 2637 #define NOTE_F7 2794 #define NOTE_FS7 2960 #define NOTE_G7 3136 #define NOTE_GS7 3322 #define NOTE_A7 3520 #define NOTE_AS7 3729 #define NOTE_B7 3951 #define NOTE_C8 4186 #define NOTE_CS8 4435 #define NOTE_D8 4699 #define NOTE_DS8 4978and save it as pitches.hReference: www.arduino.cchttps://www.youtube.com/watch?v=Vk1fpPXUIJU
Subscribe to:
Comments (Atom)


